| Tutorials by Category | |
|---|---|
|
CAS | Patterns | Objects | Building | Worlds | Modding | Modding Reference |
Contents |
Introduction
This is a brief tutorial on making morphs for clothing using Wes' MorphMangle plugin and CmarNYC's MorphMaker. The process is simple, and anyone with the skills to make basic CAS meshes should be able to do this quite easily. There is one caveat: this method can only be used if you restrict yourself to moving vertices around on the mesh - not adding or deleting them.
Skills required
- Basic meshing skills - this will not teach you what a mesh is, how to use Milkshape or how to texture/UV map. This tutorial is intended for those who already have basic meshing abilities, but struggle with morphs.
Programs/Tools required
You will need to own:
- Milkshape 3D. It is also possible to make CAS content using Blender, however there is no MorphMangle for Blender, so it's not used here.
You will need to download:
- S3PE by Inge & Peter Jones. Don't be put off by S3PE. It's a very powerful tool which can be used to do almost anything with Sims 3 CC files: which is why there will be very specific instructions on its use included in this tutorial. ;) We will use S3PE to extract the basegame morphs for us to base our morphs on.
- CTU by Delphy & jonha. If you don't already know what CTU is, this is not the tutorial for you.
- MorphMangle by WesHowe. This is a very handy plugin which will automatically adjust morphs for you in Milkshape. Install it by placing the DLL files in Program Files/Milkshape 3D.
- MorphMaker by CmarNYC. We will use this to turn the morphs created with Milkshape and MorphMangle into proper morph files for the game.
Although these are not absolutely required for this tutorial, all meshers should have:
- Demon's Align Normals plugin or Cat's Normals Smoother
- The UniMesh collection by WesHowe
- Wes' GEOM plugins (this one is required, actually)
Morph Basics
I find it impossible to learn how to do something without understanding why and how it works, so I'll try to briefly explain the basics of what morphs are and how they work.
You're reading this tutorial, so I'll assume you know what morphs are in a basic sense: when you use the body sliders in CAS, the morphs are what cause the shape of the mesh to change.
As we'll discover soon, all EA meshes have one base mesh and several morph meshes, per mesh part, per LOD. This can add up to a lot of meshes to work with! However, the meshes themselves are not the morphs - they are guides.
The morph meshes represent the mesh as it will look at "full morph" - so when, for example, the fat slider is pulled all the way over to 100% fat. But what about all the points in between? What about 50% fat? What about 30%? What about 74.6%? We don't have a mesh for every possible shape and size of sim!
In fact, the only mesh that the game actually uses is the base mesh. The actual morphs are stored in BGEO files, and they're just numbers.
Every vertex in the base mesh has an ID number by which the game can label it. Inside the BGEO file is basically a table: there is one row for each vertex, and next to that, the direction and distance that the vertex should move in order to get to 100% fat (or fit, or pregnant, or whatever).
If the BGEO file says that vertex #36 has to move 4 inches to the left to get to 100% fat (ok, it's a bit more complicated than that, but I'm a lawyer, not a mathematician - I do analogies!), then if you slide the fat slider to 50% fat, the vertex will move 2 inches to the left; if you want 25% fat, the vertex will move 1 inch. And if you have a slider hack and you make the sim 200% fat, the vertex will move 8 inches.
So what are the morph meshes for? Well, modders and EA are all human (just about). If you give a mesher a big table of numbers and say "Make the sim fat!", they'll just give you a blank stare. So instead we make morph meshes, because it's easier that way, and then we automatically turn them into tables of numbers by comparing the base mesh and the morph mesh, to see how each vertex has been moved between the two of them. That's what MorphMaker does.
Making Morphs (Stupid Easy)
Extracting meshes and morphs
You presumably already know how to extract meshes with CTU, so do that - extract the meshes for the item you want to clone, and note down the name in the Mesh Name box. If you're cloning an EP item using S3PE, then keep FullBuild open, as you'll need it for the next step.
In this example, I'll be using cfBodyDressBelowKnee_halterBow as a base. It's a child outfit, which means it only has one morph - children can only get fat, not thin, muscular, or pregnant. If you're a newbie to morphs, I suggest you use a child mesh to practise on, to get used to morphs before you take on a bigger project with more morphs.
This is a basegame item, so I need to open FullBuild0.package in S3PE, which is found in (Program Files)/The Sims 3/GameData/Shared/Packages. If you're using a basegame mesh, go ahead and open that file in S3PE. If you're cloning an EP item, you should already have the right file open. Be patient - it will take some time for S3PE to load everything.
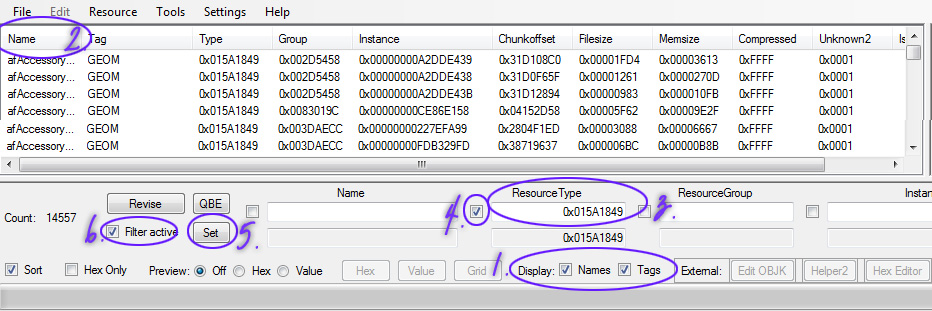
Once the file has loaded, we need to find our morphs. First, make sure that "Names" and "Tags" are both ticked at the bottom of the S3PE window - ticking names may cause another pause, as S3PE has to load all the resource names. Click the header of the Name column to organise the resources alphabetically.
Now we're going to filter the resources, so we only see GEOMs. Into the ResourceType box at the bottom of the S3PE window, paste: 0x015A1849 . Tick the box to the left of that field, click Set (this should copy the number into the greyed out box), and then tick Filter active. We now only see GEOMs.
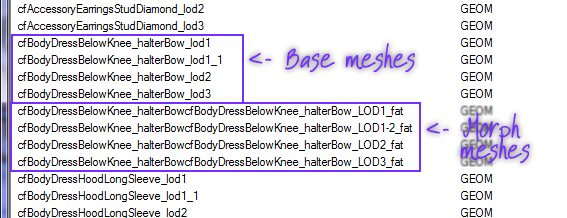
With the resources listed alphabetically, find the files with the name of the outfit you're cloning - in my case cfBodyDressBelowKnee_halterBow.
The first few meshes you should be familiar with: they're the LODs 1-3 and, in this case, the LOD1_1, as the mesh has two parts. You don't need to extract these, you've already extracted them with CTU.
What you want is the meshes with _fat on the end of them. These are the guide meshes for the fat morph, for each LOD. Select them all, right click, and select Export... to file. Save in your project folder, and close S3PE.
MorphMangle
Pay attention! You have to do this bit right!
This mesh has two parts, but the second part is just the neck (Thanks, EA! Really great meshing there!), so we're going to ignore it for now (since I only want to play with the skirt). Open Milkshape, and import the base mesh - so that's the regular lod1. Then import the lod1_fat - it should be imported as a new group. Select the first group - the base mesh - and duplicate it (Ctrl-D). Name the duplicate "reference". Your groups should now look like this:
You can now hide the fat group and the reference group, and make your changes to the base. Remember to only move vertices - don't add or delete them, and don't touch the reference group!
Intermission!
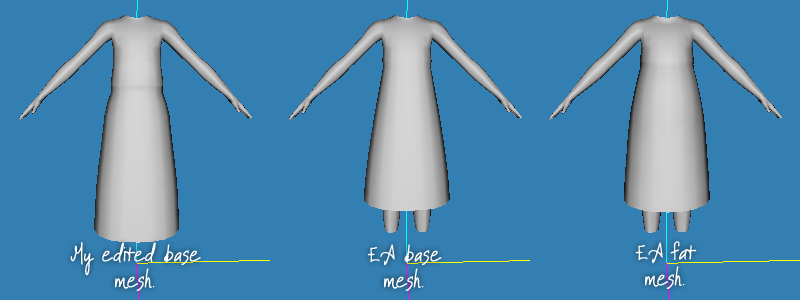
Right - we've now made changes. Mine look like this, in comparison to the original and the fat morph:
So you can see that while the changes aren't drastic, they do make a visible difference.
What MorphMangle does is copy changes. As we know, each vertex on the original mesh has an ID number, and they each have a "partner" vertex with the same ID number on the fat mesh. Now that we've duplicated the base mesh, each vertex on the base mesh has a partner on the fat morph and one on the reference mesh. MorphMangle will compare every vertex on the edited base mesh with its partner on the reference mesh, and figure out how you've moved that vertex. Then it will apply the changes you made to the vertex on the base mesh, to the vertex's partner on the fat morph.
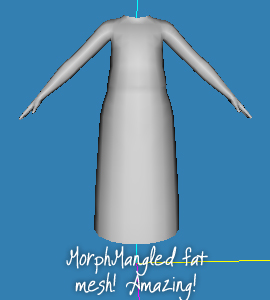
You can find MMangle under the Vertex menu - run it, and ok the warnings. And this is what we get:
Magic! Now, remember that MorphMangle isn't perfect - you may need to make some adjustments to the morph mesh to get things looking smooth and natural. In my case, I need to fix the bone assignments and the UVMapping too.
If you need to make any more changes to the base mesh, delete the existing reference group. Then duplicate the edited base mesh again to make a second reference group, make your changes, and run MorphMangle again.
MorphMaker
Ordinarily, you would do the above for all three LODs, so you'd end up with three morph meshes. For the sake of brevity, I've only done one LOD, so the following section only uses one LOD.
Remember to save as MS3D so you can go back and work more on the mesh later. Now export using the GEOM export plugin: export the base mesh and the fat morph, but not the reference group. We're going to turn this into an actual, working, morphed outfit.
First, import the meshes in CTU as normal - change the mesh name, commit, load up the LODs (don't forget the LOD1_1! :P), commit again, and save, and close CTU.
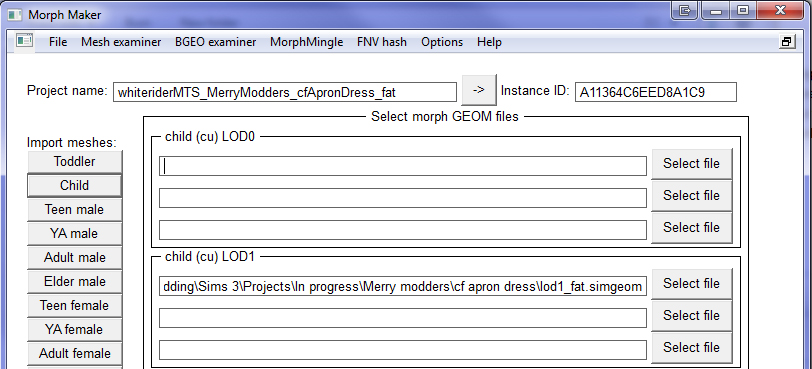
Now, open MorphMaker. Name your project - I tend to use the same name as the mesh name, plus the morph name - and hit the arrow button to generate an Instance. Select the age (and gender) you want to make morphs for, and load up the morph mesh - not the base mesh! If the mesh has several parts, put one part in each box, starting with 0. Do this for all the LODs (I've only made one - in practise you will have three).
Then, under Make Morphs, pick Clothing. Hit Create BGEO, and save with the default name.
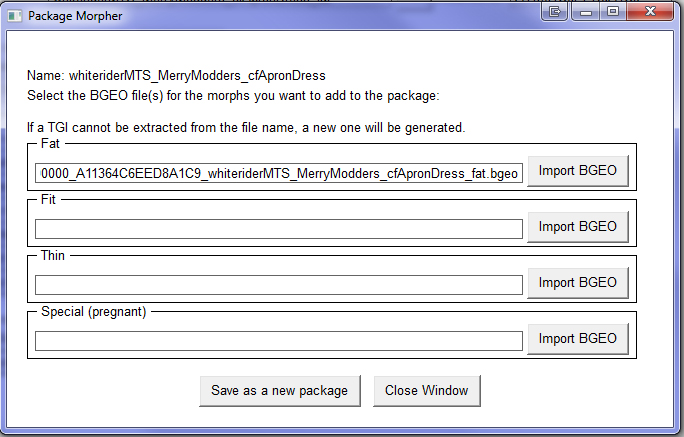
Then hit Add morphs to package, select the package file you saved in CTU, then select the BGEO file you just saved and put it in the appropriate slot. Hit Save as new package, name the file - remember to add the .package extension - save, and you're done!
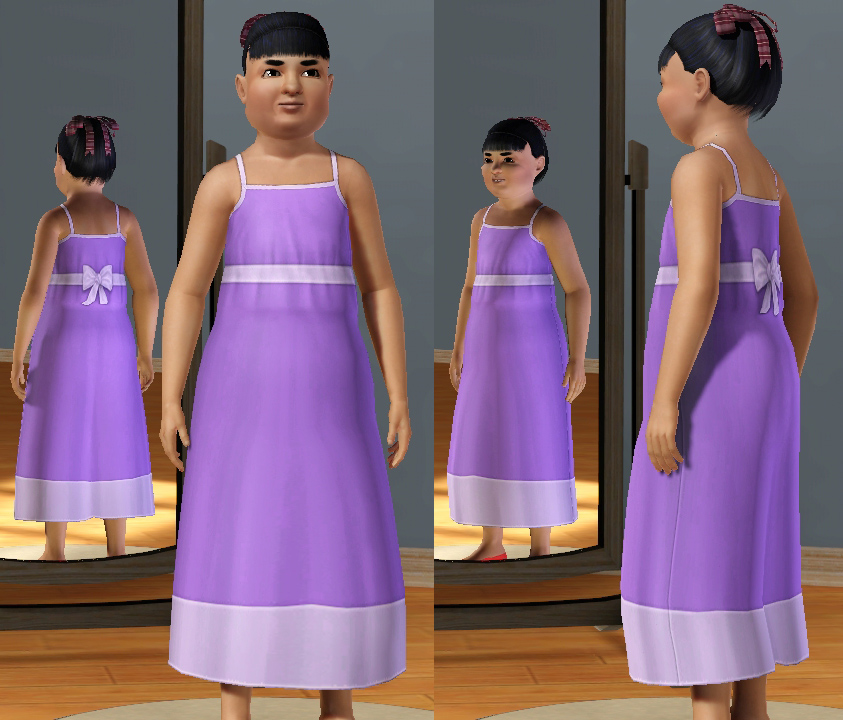
Pop the file in Mods/Packages, and let's test!
Ignoring the fact that I haven't corrected the bones, UV mapping, or texture; it's looking good! And even better - it takes about five minutes to make morphs this way. Yay!
Related Links
For a tutorial on making morphs by hand - i.e. not using MorphMangle - see Meshing For Dummies (post #2) by CmarNYC.
Questions? Comments? Suggestions?
Post here! MTS thread
| Tutorials by Category | |
|---|---|
|
CAS | Patterns | Objects | Building | Worlds | Modding | Modding Reference |

 Sign in to Mod The Sims