 Sims 2 - Lot Planner
SCREENSHOTS
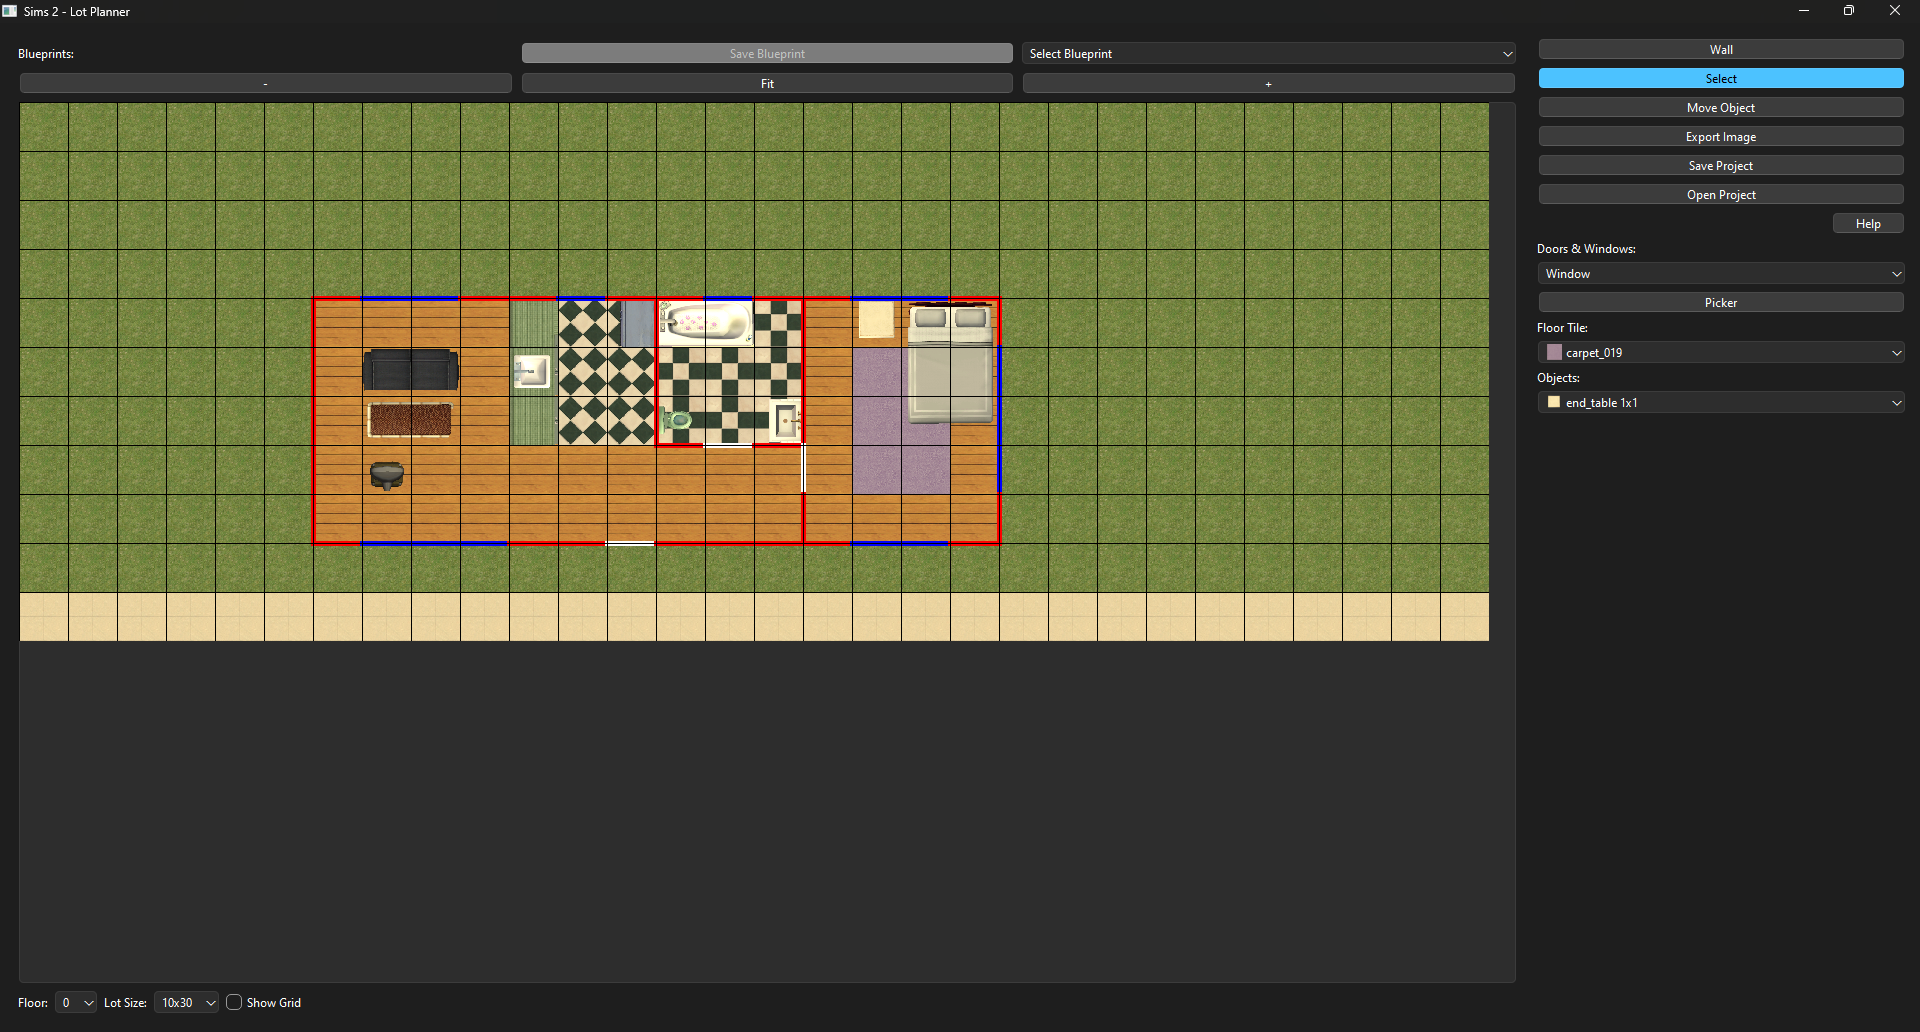
sims lot planner.png - width=1920 height=1032
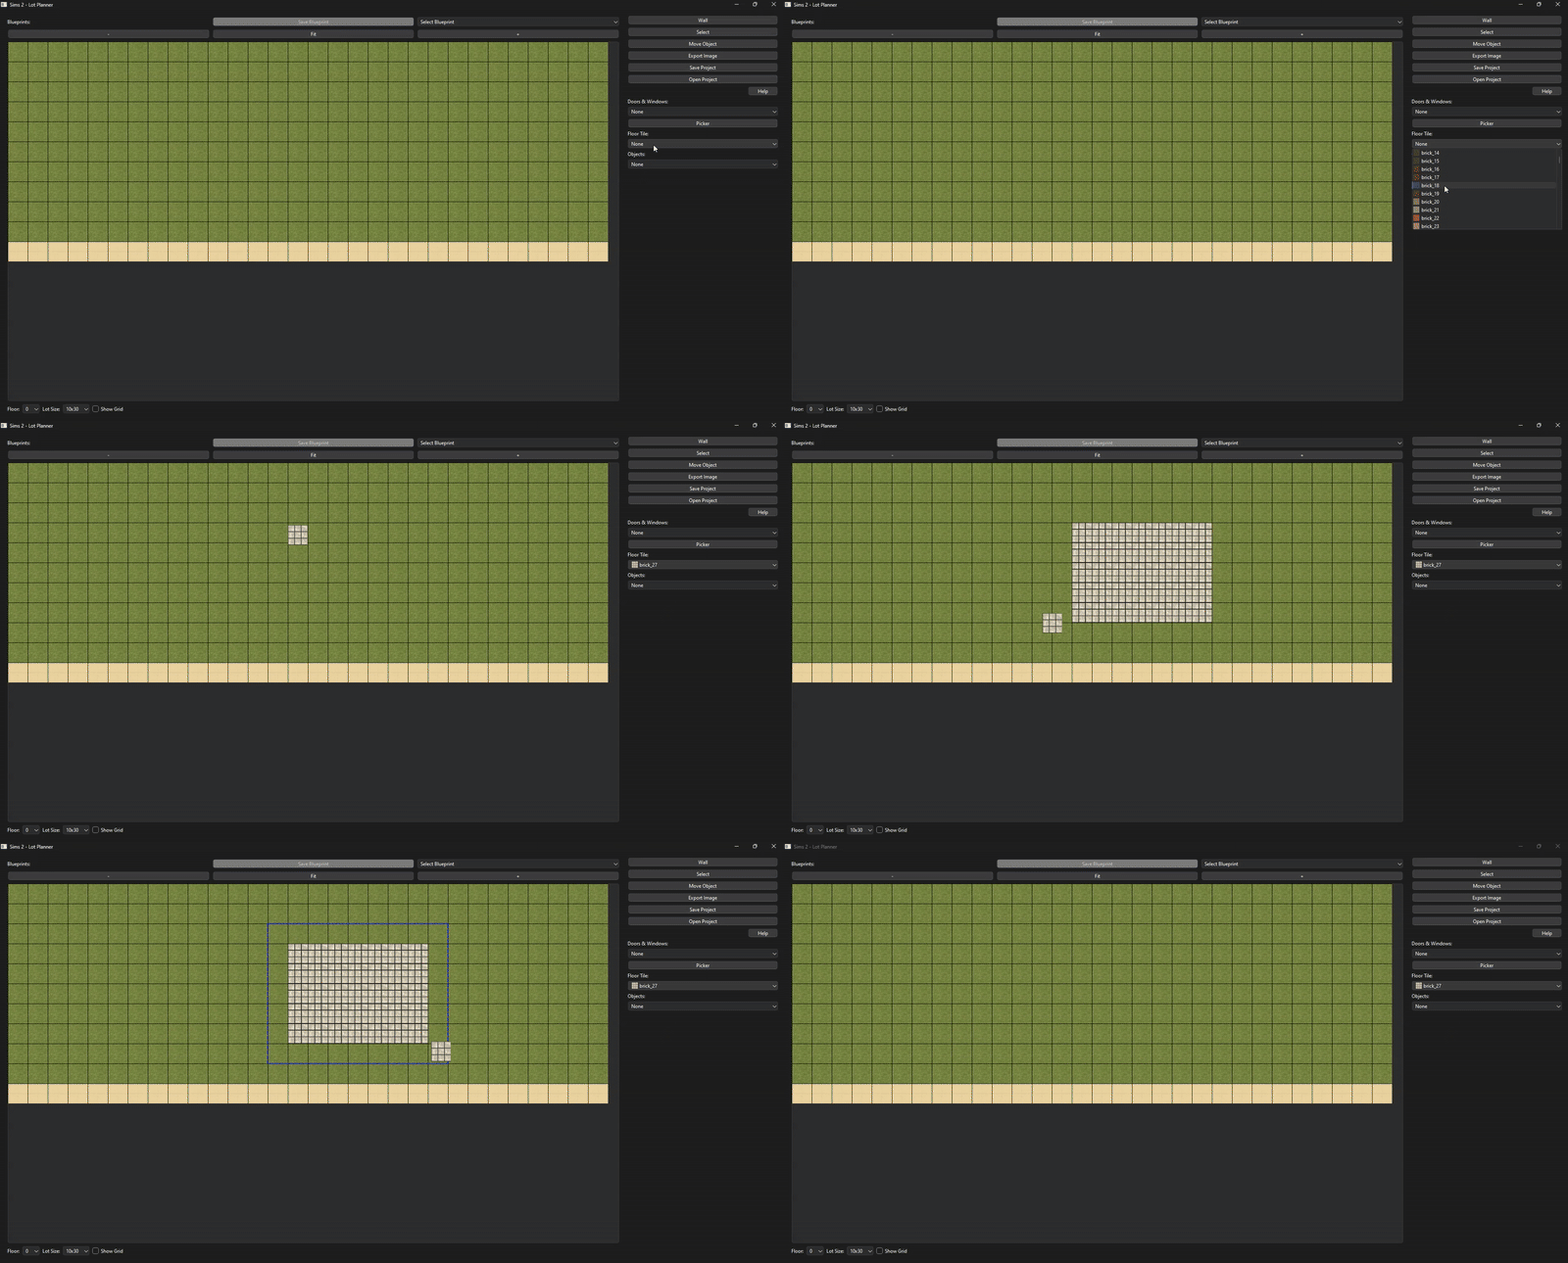
floor tool.gif - width=800 height=430
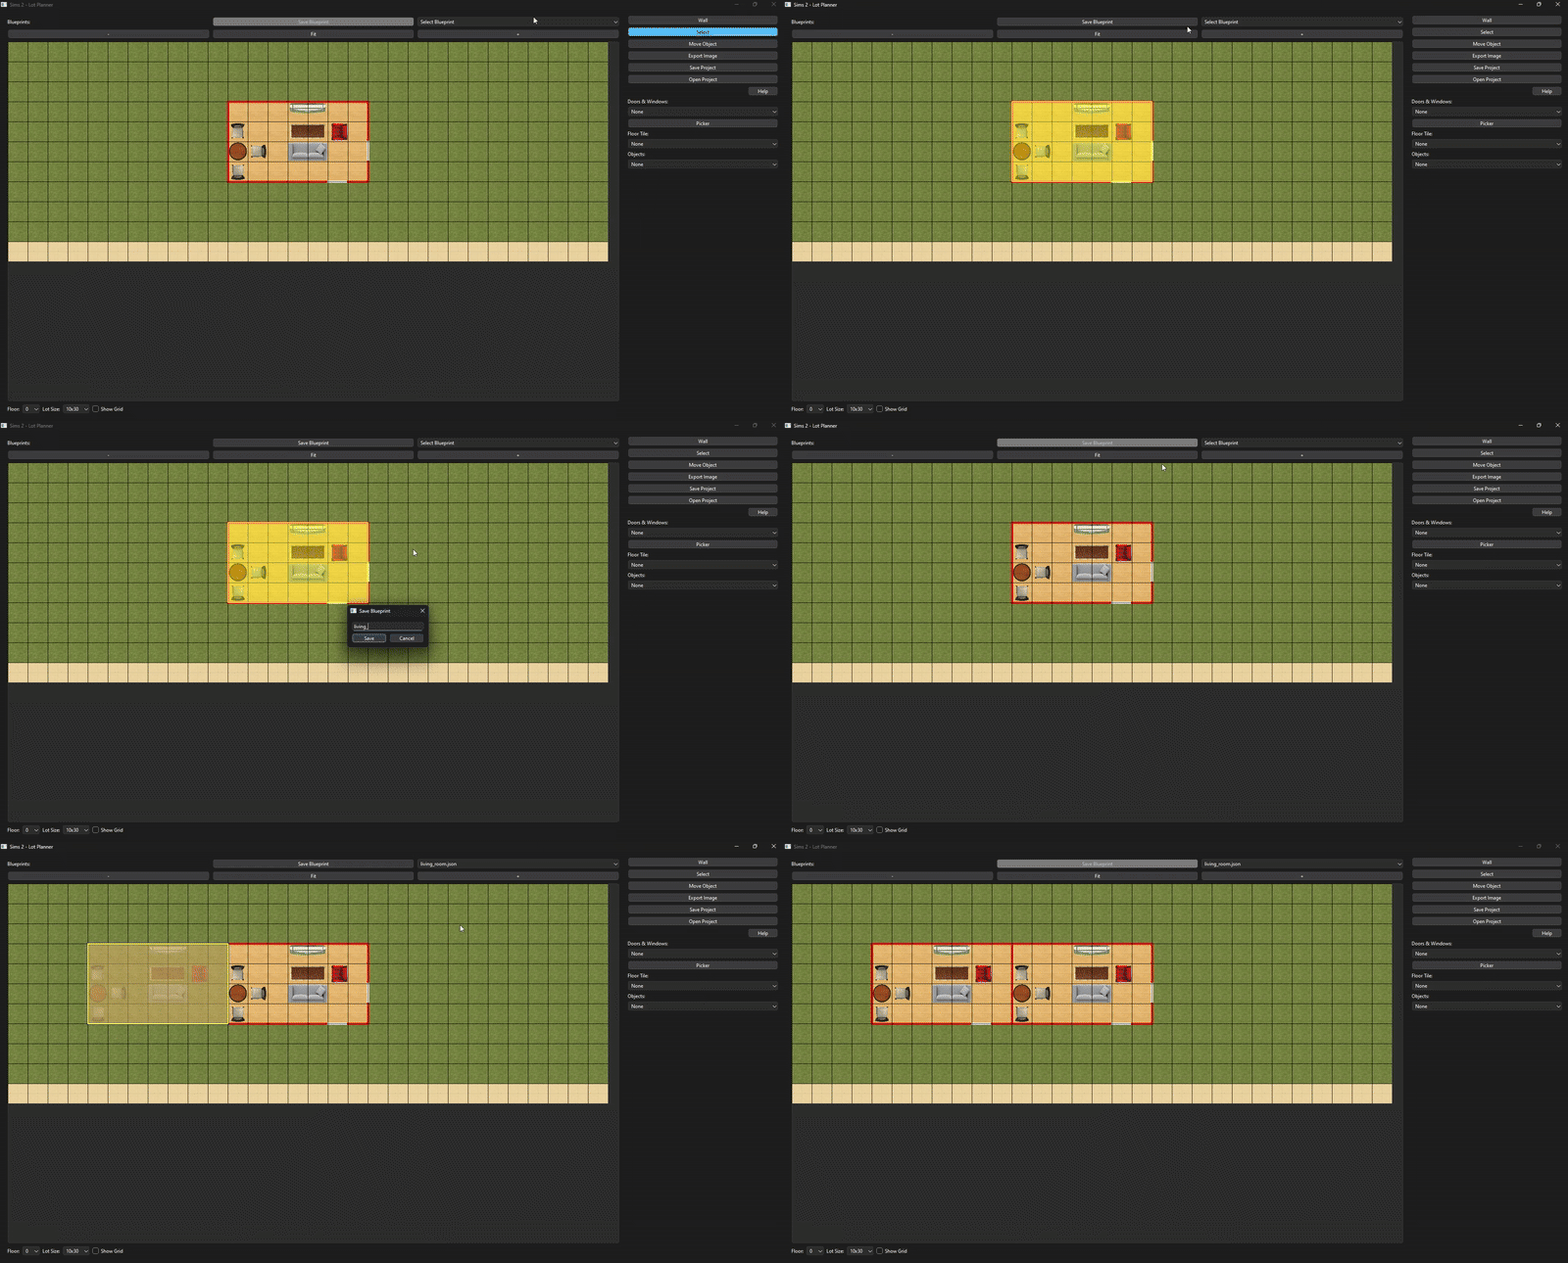
blueprint.gif - width=800 height=430
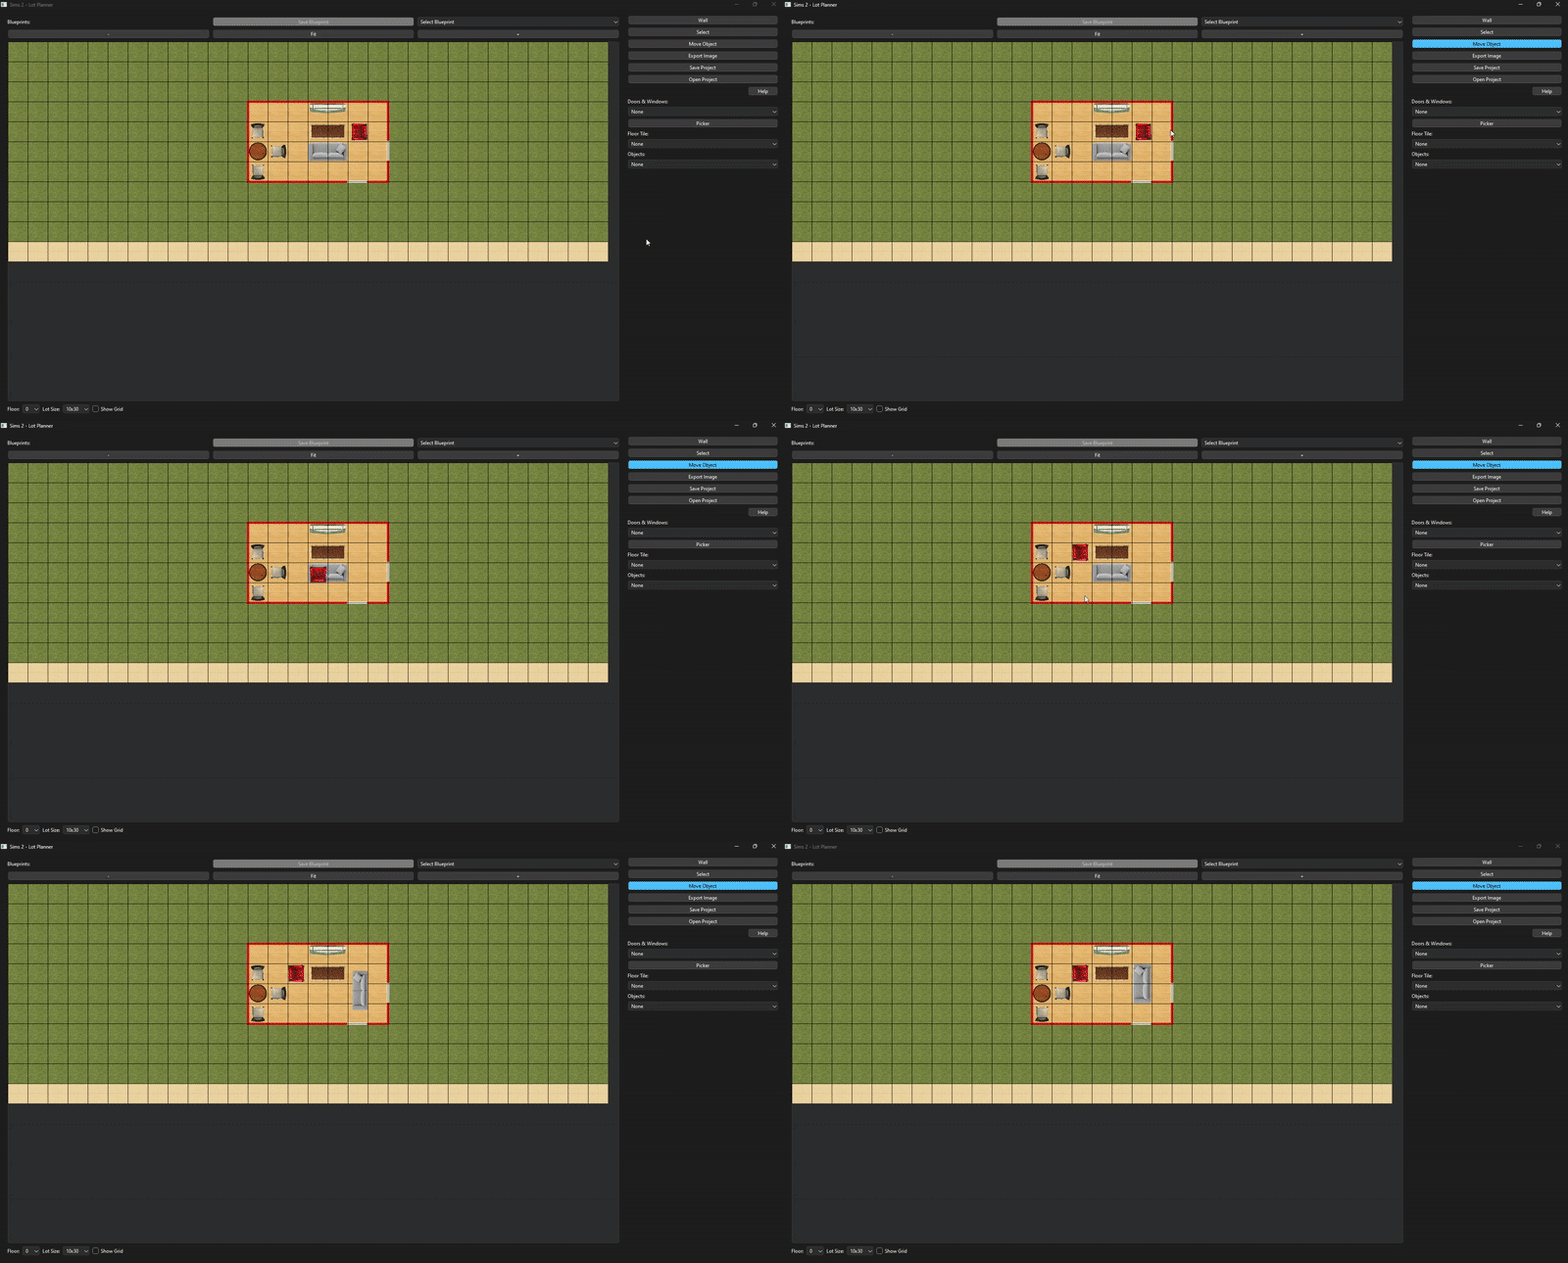
move object tool.gif - width=800 height=430

object tool.gif - width=800 height=430

picker tool.gif - width=800 height=430

select tool - delete.gif - width=800 height=430

select tool - move.gif - width=800 height=430

wall tool.gif - width=800 height=430
Downloaded 565 times
100 Thanks
38 Favourited
5,539 Views
Say Thanks!
Thanked!
Sims 2 – Lot Planner Guide
1. Introduction
This application provides a grid‐based interface for planning your Sims 2 plot builds. It enables you to draw walls, add doors and windows, paint or remove floors, place objects, manage selections and blueprints, adjust lot size, export PNG images, and save/open complete projects.
2. Drawing Walls - Adding Doors and Windows
Choose the wall tool from the toolbar.
Click and drag on the grid to mark the start and end points of your wall.
You can draw horizontal, vertical, and diagonal walls.
Select the desired door/window from the Doors & Windows dropdown.
Click on a wall that is placed on the canvas to add the door/window to it.

3. Painting Floors
Choose a floor texture from the Floor Tile dropdown.
Click and drag across the grid to paint the floor area over the ground layer.
Press the comma key (,) to rotate it counterclockwise or the period key (.) to rotate it clockwise before placing.
To remove floor from the canvas, be in floor painting mode and drag a selection box with the right mouse button.
To add custom floor textures, simply place .png files into the floor folder (files that contain “water” in their name will be transparent).

4. Adding Objects
Select the object from the Objects dropdown.
Click on the grid to place the object.
Press the comma key (,) to rotate it counterclockwise or the period key (.) to rotate it clockwise before placing.
To remove an object from the canvas, be in object placement mode and right-click on the object in the canvas.
To add custom objects, place .png files into the objects folder and include its dimensions in the filename (e.g., for a table, use "table 1x3.png").

5. Move Objects
Click Move button to enter object moving mode
Click on existing object on canvas to pick it up, then you can rotate it and place it again on canvas on different position.

6. Picker Tool
Use the picker tool to quickly select an existing floor tile or object.
Click on the desired cell; its properties are loaded for you to reuse in painting or object placement.

7. Selection Tool
Activate the selection tool to define a region on the canvas.
Click and drag to create a selection box around the area you want to work with.
You can move the selection using the arrow keys, with a ghost preview showing its new location.
Rotate the selection using the comma (rotate -90°) or period (rotate +90°) keys.
Finalize the selection by pressing Enter, which applies the changes to your design.

8. Delete
Make a selection box and press the Delete key on the keyboard; this will remove all walls, floors, and objects from the canvas that were in the selection box.

9. Saving Blueprints
With a selection made, click the Save Blueprint button.
Enter a name for your blueprint when prompted.
To load a blueprint, simply select a saved blueprint from the Blueprint dropdown.
The blueprint appears as a ghost preview on your canvas.
You can reposition and rotate the blueprint before adding it to the canvas with the Enter key.

10. Undo (CTRL+Z)
If you need to revert an action, press CTRL+Z.
11. Zoom In/Zoom Out
Use the mouse wheel to zoom in or out of the canvas, or use the + and - buttons above the canvas.
Click the Fit button to fit the canvas to available space.
12. Floors
Select Floor from the dropdown to change the floor you wish to work on.
13. Lot Size
Adjust the dimensions of your lot via the Lot dropdown.
14. Show Grid
Check this box if you want to see cell locations on the canvas.
15. Exporting PNGs
Click the Export button to generate PNG images of your lot build.
16. Saving and Opening Projects
To save your project, use the Save Project button.
To open an existing project, click the Open Project button.
This guide should help you navigate and make the most of Sims 2 – Lot Planner. Enjoy planning your perfect Sims 2 lot!
1. Introduction
This application provides a grid‐based interface for planning your Sims 2 plot builds. It enables you to draw walls, add doors and windows, paint or remove floors, place objects, manage selections and blueprints, adjust lot size, export PNG images, and save/open complete projects.
2. Drawing Walls - Adding Doors and Windows
Choose the wall tool from the toolbar.
Click and drag on the grid to mark the start and end points of your wall.
You can draw horizontal, vertical, and diagonal walls.
Select the desired door/window from the Doors & Windows dropdown.
Click on a wall that is placed on the canvas to add the door/window to it.
3. Painting Floors
Choose a floor texture from the Floor Tile dropdown.
Click and drag across the grid to paint the floor area over the ground layer.
Press the comma key (,) to rotate it counterclockwise or the period key (.) to rotate it clockwise before placing.
To remove floor from the canvas, be in floor painting mode and drag a selection box with the right mouse button.
To add custom floor textures, simply place .png files into the floor folder (files that contain “water” in their name will be transparent).
4. Adding Objects
Select the object from the Objects dropdown.
Click on the grid to place the object.
Press the comma key (,) to rotate it counterclockwise or the period key (.) to rotate it clockwise before placing.
To remove an object from the canvas, be in object placement mode and right-click on the object in the canvas.
To add custom objects, place .png files into the objects folder and include its dimensions in the filename (e.g., for a table, use "table 1x3.png").
5. Move Objects
Click Move button to enter object moving mode
Click on existing object on canvas to pick it up, then you can rotate it and place it again on canvas on different position.
6. Picker Tool
Use the picker tool to quickly select an existing floor tile or object.
Click on the desired cell; its properties are loaded for you to reuse in painting or object placement.
7. Selection Tool
Activate the selection tool to define a region on the canvas.
Click and drag to create a selection box around the area you want to work with.
You can move the selection using the arrow keys, with a ghost preview showing its new location.
Rotate the selection using the comma (rotate -90°) or period (rotate +90°) keys.
Finalize the selection by pressing Enter, which applies the changes to your design.
8. Delete
Make a selection box and press the Delete key on the keyboard; this will remove all walls, floors, and objects from the canvas that were in the selection box.
9. Saving Blueprints
With a selection made, click the Save Blueprint button.
Enter a name for your blueprint when prompted.
To load a blueprint, simply select a saved blueprint from the Blueprint dropdown.
The blueprint appears as a ghost preview on your canvas.
You can reposition and rotate the blueprint before adding it to the canvas with the Enter key.
10. Undo (CTRL+Z)
If you need to revert an action, press CTRL+Z.
11. Zoom In/Zoom Out
Use the mouse wheel to zoom in or out of the canvas, or use the + and - buttons above the canvas.
Click the Fit button to fit the canvas to available space.
12. Floors
Select Floor from the dropdown to change the floor you wish to work on.
13. Lot Size
Adjust the dimensions of your lot via the Lot dropdown.
14. Show Grid
Check this box if you want to see cell locations on the canvas.
15. Exporting PNGs
Click the Export button to generate PNG images of your lot build.
16. Saving and Opening Projects
To save your project, use the Save Project button.
To open an existing project, click the Open Project button.
This guide should help you navigate and make the most of Sims 2 – Lot Planner. Enjoy planning your perfect Sims 2 lot!
| Filename | Type | Size |
|---|---|---|
| Sims 2 - Lot Planner.zip | zip | |
| brick.png | png | 51525 |
| brick_01.png | png | 50171 |
| brick_02.png | png | 52154 |
| brick_03.png | png | 49769 |
| brick_04.png | png | 47789 |
| brick_05.png | png | 46720 |
| brick_06.png | png | 48287 |
| brick_07.png | png | 46271 |
| brick_08.png | png | 58866 |
| brick_09.png | png | 59486 |
| brick_10.png | png | 58869 |
| brick_11.png | png | 58193 |
| brick_12.png | png | 53874 |
| brick_13.png | png | 54178 |
| brick_14.png | png | 53843 |
| brick_15.png | png | 53613 |
| brick_16.png | png | 58055 |
| brick_17.png | png | 58608 |
| brick_18.png | png | 58464 |
| brick_19.png | png | 58151 |
| brick_20.png | png | 50669 |
| brick_21.png | png | 50183 |
| brick_22.png | png | 46894 |
| brick_23.png | png | 65214 |
| brick_24.png | png | 68039 |
| brick_25.png | png | 58255 |
| brick_26.png | png | 45940 |
| brick_27.png | png | 44592 |
| brick_28.png | png | 51998 |
| brick_29.png | png | 52531 |
| brick_30.png | png | 51826 |
| brick_31.png | png | 51535 |
| brick_32.png | png | 33525 |
| brick_33.png | png | 50868 |
| brick_34.png | png | 52559 |
| brick_35.png | png | 52616 |
| brick_36.png | png | 52304 |
| carpet.png | png | 59514 |
| carpet_001.png | png | 43559 |
| carpet_002.png | png | 59690 |
| carpet_003.png | png | 51390 |
| carpet_004.png | png | 59167 |
| carpet_005.png | png | 42852 |
| carpet_006.png | png | 59159 |
| carpet_007.png | png | 50586 |
| carpet_008.png | png | 60103 |
| carpet_009.png | png | 43880 |
| carpet_010.png | png | 60186 |
| carpet_011.png | png | 51734 |
| carpet_012.png | png | 59128 |
| carpet_013.png | png | 58876 |
| carpet_014.png | png | 52976 |
| carpet_015.png | png | 49047 |
| carpet_016.png | png | 48877 |
| carpet_017.png | png | 57210 |
| carpet_018.png | png | 37094 |
| carpet_019.png | png | 44635 |
| carpet_020.png | png | 47948 |
| carpet_021.png | png | 47937 |
| carpet_022.png | png | 44790 |
| carpet_023.png | png | 46838 |
| dirt.png | png | 1138008 |
| grass.png | png | 19531 |
| sand.png | png | 18668 |
| stone.png | png | 49045 |
| stone_01.png | png | 45898 |
| stone_02.png | png | 54080 |
| stone_03.png | png | 45629 |
| stone_04.png | png | 46976 |
| stone_05.png | png | 47886 |
| stone_06.png | png | 47723 |
| stone_07.png | png | 50114 |
| stone_08.png | png | 46484 |
| stone_09.png | png | 47399 |
| stone_10.png | png | 52432 |
| stone_11.png | png | 57500 |
| stone_12.png | png | 50631 |
| stone_13.png | png | 51194 |
| stone_14.png | png | 43253 |
| stone_15.png | png | 59129 |
| stone_16.png | png | 49899 |
| stone_17.png | png | 66149 |
| stone_18.png | png | 55755 |
| stone_19.png | png | 39037 |
| stone_20.png | png | 67183 |
| stone_21.png | png | 64409 |
| stone_22.png | png | 58747 |
| stone_23.png | png | 59515 |
| stone_24.png | png | 44645 |
| stone_25.png | png | 59093 |
| stone_26.png | png | 52229 |
| stone_27.png | png | 56633 |
| stone_28.png | png | 52213 |
| stone_29.png | png | 43034 |
| stone_30.png | png | 45462 |
| stone_31.png | png | 36832 |
| stone_32.png | png | 46477 |
| stone_33.png | png | 48098 |
| stone_34.png | png | 37128 |
| stone_35.png | png | 47809 |
| stone_36.png | png | 47385 |
| stone_37.png | png | 68864 |
| stone_38.png | png | 70417 |
| stone_39.png | png | 68151 |
| stone_40.png | png | 50174 |
| stone_41.png | png | 62045 |
| stone_42.png | png | 61676 |
| stone_43.png | png | 47782 |
| stone_44.png | png | 43997 |
| stone_45.png | png | 26695 |
| stone_46.png | png | 26684 |
| stone_47.png | png | 26520 |
| stone_48.png | png | 54197 |
| stone_49.png | png | 65433 |
| stone_50.png | png | 66254 |
| stone_51.png | png | 64762 |
| stone_52.png | png | 65066 |
| stone_53.png | png | 65064 |
| stone_54.png | png | 64212 |
| stone_55.png | png | 64757 |
| stone_56.png | png | 42385 |
| stone_57.png | png | 68204 |
| stone_58.png | png | 24153 |
| stone_59.png | png | 50795 |
| stone_60.png | png | 63113 |
| stone_61.png | png | 60340 |
| stone_62.png | png | 66586 |
| stone_63.png | png | 64198 |
| stone_64.png | png | 46951 |
| stone_65.png | png | 61682 |
| stone_66.png | png | 50806 |
| stone_67.png | png | 52731 |
| stone_68.png | png | 50365 |
| stone_69.png | png | 60617 |
| stone_70.png | png | 45639 |
| stone_71.png | png | 36413 |
| stone_72.png | png | 42633 |
| stone_73.png | png | 41031 |
| stone_74.png | png | 48797 |
| tile 3.png | png | 68957 |
| tile.png | png | 51051 |
| tile2.png | png | 52072 |
| tile_001.png | png | 49584 |
| tile_002.png | png | 36872 |
| tile_003.png | png | 31133 |
| tile_004.png | png | 19752 |
| tile_005.png | png | 50868 |
| tile_006.png | png | 75851 |
| tile_007.png | png | 55295 |
| tile_008.png | png | 60170 |
| tile_009.png | png | 57724 |
| tile_010.png | png | 6325 |
| tile_011.png | png | 45972 |
| tile_012.png | png | 48181 |
| tile_013.png | png | 15655 |
| tile_014.png | png | 44001 |
| tile_015.png | png | 43738 |
| tile_016.png | png | 43062 |
| tile_017.png | png | 51059 |
| tile_018.png | png | 58972 |
| tile_019.png | png | 45397 |
| tile_020.png | png | 55958 |
| tile_021.png | png | 59387 |
| tile_022.png | png | 40850 |
| tile_023.png | png | 52153 |
| tile_024.png | png | 43224 |
| tile_025.png | png | 46835 |
| tile_026.png | png | 53244 |
| tile_027.png | png | 54077 |
| tile_028.png | png | 54937 |
| tile_029.png | png | 53591 |
| tile_030.png | png | 56567 |
| tile_031.png | png | 52585 |
| tile_032.png | png | 49175 |
| tile_033.png | png | 44519 |
| tile_034.png | png | 38147 |
| tile_035.png | png | 43840 |
| tile_036.png | png | 61104 |
| tile_037.png | png | 53738 |
| tile_038.png | png | 61505 |
| tile_039.png | png | 53481 |
| tile_040.png | png | 62672 |
| tile_041.png | png | 64781 |
| tile_042.png | png | 71786 |
| tile_043.png | png | 67119 |
| tile_044.png | png | 51687 |
| tile_045.png | png | 62718 |
| tile_046.png | png | 9472 |
| tile_047.png | png | 45346 |
| tile_048.png | png | 9780 |
| tile_049.png | png | 44426 |
| tile_050.png | png | 51025 |
| tile_051.png | png | 47470 |
| tile_052.png | png | 9136 |
| tile_053.png | png | 49743 |
| tile_054.png | png | 46118 |
| tile_055.png | png | 42195 |
| tile_056.png | png | 8376 |
| tile_057.png | png | 55224 |
| tile_058.png | png | 41914 |
| tile_059.png | png | 50054 |
| tile_060.png | png | 59475 |
| tile_061.png | png | 58265 |
| tile_062.png | png | 33558 |
| tile_063.png | png | 35847 |
| tile_064.png | png | 39483 |
| tile_065.png | png | 36307 |
| tile_066.png | png | 40075 |
| tile_067.png | png | 39905 |
| tile_068.png | png | 45549 |
| tile_069.png | png | 51145 |
| tile_070.png | png | 38054 |
| tile_071.png | png | 47755 |
| tile_072.png | png | 43187 |
| tile_073.png | png | 46885 |
| tile_074.png | png | 73579 |
| tile_075.png | png | 69985 |
| tile_076.png | png | 54149 |
| tile_077.png | png | 56013 |
| tile_078.png | png | 30855 |
| tile_079.png | png | 23307 |
| tile_080.png | png | 29770 |
| tile_081.png | png | 3184 |
| tile_082.png | png | 19238 |
| tile_083.png | png | 8987 |
| tile_084.png | png | 25477 |
| tile_085.png | png | 35417 |
| tile_086.png | png | 38206 |
| tile_087.png | png | 23323 |
| tile_088.png | png | 24928 |
| tile_089.png | png | 25428 |
| tile_090.png | png | 26615 |
| tile_091.png | png | 32089 |
| tile_092.png | png | 28584 |
| tile_093.png | png | 25978 |
| tile_094.png | png | 25715 |
| tile_095.png | png | 28588 |
| tile_096.png | png | 33541 |
| tile_097.png | png | 29777 |
| tile_098.png | png | 32986 |
| tile_099.png | png | 29426 |
| tile_100.png | png | 28682 |
| tile_101.png | png | 29338 |
| tile_102.png | png | 26235 |
| tile_103.png | png | 34891 |
| tile_104.png | png | 31405 |
| tile_105.png | png | 26246 |
| tile_106.png | png | 27387 |
| tile_107.png | png | 32595 |
| tile_108.png | png | 30499 |
| tile_109.png | png | 34307 |
| tile_110.png | png | 31383 |
| tile_111.png | png | 54343 |
| tile_112.png | png | 31037 |
| tile_113.png | png | 31024 |
| tile_114.png | png | 28315 |
| tile_115.png | png | 21854 |
| tile_116.png | png | 17047 |
| tile_117.png | png | 18177 |
| tile_118.png | png | 11161 |
| tile_119.png | png | 12996 |
| tile_120.png | png | 53940 |
| tile_121.png | png | 45453 |
| tile_122.png | png | 46632 |
| tile_123.png | png | 48135 |
| tile_124.png | png | 34237 |
| tile_125.png | png | 51235 |
| tile_126.png | png | 31828 |
| tile_127.png | png | 48974 |
| tile_128.png | png | 27649 |
| tile_129.png | png | 51642 |
| tile_130.png | png | 55026 |
| tile_131.png | png | 61076 |
| tile_132.png | png | 43814 |
| tile_133.png | png | 47029 |
| tile_134.png | png | 37586 |
| tile_135.png | png | 45210 |
| tile_136.png | png | 41567 |
| tile_137.png | png | 43530 |
| tile_138.png | png | 53316 |
| tile_139.png | png | 52911 |
| tile_140.png | png | 44701 |
| tile_141.png | png | 44051 |
| tile_142.png | png | 41637 |
| tile_143.png | png | 40331 |
| tile_144.png | png | 36902 |
| tile_145.png | png | 37580 |
| tile_146.png | png | 34698 |
| tile_147.png | png | 34890 |
| tile_148.png | png | 52501 |
| tile_149.png | png | 50271 |
| tile_150.png | png | 37987 |
| tile_151.png | png | 51674 |
| tile_152.png | png | 49446 |
| tile_153.png | png | 51914 |
| tile_154.png | png | 54477 |
| tile_155.png | png | 54078 |
| tile_156.png | png | 44773 |
| tile_157.png | png | 47456 |
| tile_158.png | png | 63555 |
| tile_159.png | png | 62163 |
| tile_160.png | png | 48267 |
| tile_161.png | png | 66818 |
| water.png | png | 387 |
| wood.png | png | 49721 |
| wood.png.jpg | jpg | 5810 |
| wood_01.png | png | 45537 |
| wood_02.png | png | 54763 |
| wood_03.png | png | 61667 |
| wood_04.png | png | 57459 |
| wood_05.png | png | 51122 |
| wood_06.png | png | 49954 |
| wood_07.png | png | 46717 |
| wood_08.png | png | 51003 |
| wood_09.png | png | 63209 |
| wood_10.png | png | 43504 |
| wood_11.png | png | 53448 |
| wood_12.png | png | 53446 |
| wood_13.png | png | 47163 |
| wood_14.png | png | 38175 |
| wood_15.png | png | 58641 |
| wood_16.png | png | 47944 |
| wood_17.png | png | 55179 |
| wood_18.png | png | 59527 |
| wood_19.png | png | 59398 |
| wood_20.png | png | 52515 |
| wood_21.png | png | 54691 |
| wood_22.png | png | 54226 |
| wood_23.png | png | 53554 |
| wood_24.png | png | 56701 |
| wood_25.png | png | 32516 |
| wood_26.png | png | 51555 |
| wood_27.png | png | 45561 |
| wood_28.png | png | 48507 |
| wood_29.png | png | 44167 |
| wood_30.png | png | 47178 |
| wood_31.png | png | 42957 |
| wood_32.png | png | 50443 |
| wood_33.png | png | 46816 |
| wood_34.png | png | 36023 |
| wood_35.png | png | 40106 |
| wood_36.png | png | 45553 |
| wood_37.png | png | 61317 |
| wood_38.png | png | 56419 |
| wood_39.png | png | 41899 |
| wood_40.png | png | 41362 |
| wood_41.png | png | 39559 |
| wood_42.png | png | 43144 |
| wood_43.png | png | 54322 |
| wood_44.png | png | 35831 |
| wood_45.png | png | 47958 |
| wood_46.png | png | 65264 |
| wood_47.png | png | 64137 |
| help.html | html | 5268 |
| arm_chair 1x1.png | png | 27815 |
| bathtub 1x2.png | png | 68931 |
| bed 1x3.png | png | 86786 |
| bed 2x3.png | png | 133593 |
| chair 1x1.png | png | 16216 |
| couch 1x2.png | png | 74768 |
| couch 1x3.png | png | 103075 |
| counter 1x1.png | png | 32487 |
| counter_corner.png | png | 28523 |
| counter_sink 1x1.png | png | 27538 |
| end_table 1x1.png | png | 27283 |
| jackusy 3x3.png | png | 325483 |
| living_room_table 1x1.png | png | 28728 |
| living_room_table 1x2.png | png | 87470 |
| refrigirator 1x1.png | png | 29101 |
| shower 1x1.png | png | 35730 |
| sink 1x1.png | png | 18137 |
| sofa 1x2.png | png | 44629 |
| sofa 1x3.png | png | 38544 |
| stove 1x1.png | png | 29075 |
| table 1x1.png | png | 27878 |
| table 1x2.png | png | 50934 |
| table 1x3.png | png | 80143 |
| table 2x2.png | png | 91154 |
| toilet 1x1.png | png | 15206 |
| tv 1x1.png | png | 21688 |
| tv 1x2.png | png | 46166 |
| tv 1x3.png | png | 59152 |
| Sims 2 - Lot Planner.exe | exe | 43238363 |
|
Sims 2 - Lot Planner.zip
| This application provides a grid‐based interface for planning your Sims 2 plot builds. It enables you to draw walls, add doors and windows, paint or remove floors, place objects, manage selections and blueprints, adjust lot size, export PNG images, and save/open complete projects.
Download
Uploaded: 18th Mar 2025, 59.43 MB.
566 downloads.
|
||||||||
| For a detailed look at individual files, see the Information tab. | ||||||||
Install Instructions
Basic Download and Install Instructions:
1. Download: Click the download link to save the .rar or .zip file(s) to your computer.
2. Extract the zip, rar, or 7z file.
3. Place in Downloads Folder: Cut and paste the .package file(s) into your Downloads folder:
1. Download: Click the download link to save the .rar or .zip file(s) to your computer.
2. Extract the zip, rar, or 7z file.
3. Place in Downloads Folder: Cut and paste the .package file(s) into your Downloads folder:
- Origin (Ultimate Collection): Users\(Current User Account)\Documents\EA Games\The Sims™ 2 Ultimate Collection\Downloads\
- Non-Origin, Windows Vista/7/8/10: Users\(Current User Account)\Documents\EA Games\The Sims 2\Downloads\
- Non-Origin, Windows XP: Documents and Settings\(Current User Account)\My Documents\EA Games\The Sims 2\Downloads\
- Mac: Users\(Current User Account)\Documents\EA Games\The Sims 2\Downloads
- Mac x64: /Library/Containers/com.aspyr.sims2.appstore/Data/Library/Application Support/Aspyr/The Sims 2/Downloads
- For a full, complete guide to downloading complete with pictures and more information, see: Game Help: Downloading for Fracking Idiots.
- Custom content not showing up in the game? See: Game Help: Getting Custom Content to Show Up.
- If you don't have a Downloads folder, just make one. See instructions at: Game Help: No Downloads Folder.
Loading comments, please wait...
Author
Download Details
Packs:
None, this is Sims 2 base game compatible!
Uploaded: 18th Mar 2025 at 7:22 PM
Updated: 24th Mar 2025 at 11:34 AM
Uploaded: 18th Mar 2025 at 7:22 PM
Updated: 24th Mar 2025 at 11:34 AM
Utility Type:
– Miscellaneous
: Tools which do not fit into the above categories.
Plugin Type:
– Not Applicable
: Standalone tools
Other Download Recommendations:

 Sign in to Mod The Sims
 Sims 2 - Lot Planner


