 Sign in to Mod The Sims
 Personal Cameras
 Personal Cameras


personalCameras-logo.png - width=300 height=225
personalCameras-freeCameras-fieldOfViewRange.jpg - width=1280 height=720
personalCameras-freeCameras-maxTiltAngle.jpg - width=1280 height=720
personalCameras-lotCamera-tiltAngleRange-zoomedIn.jpg - width=1280 height=720
personalCameras-lotCamera-tiltAngleRange-zoomedOut.jpg - width=1280 height=720
personalCameras-nhoodCamera-zoomRange.jpg - width=1280 height=720
personalCameras-nhoodCamera-movementRange.jpg - width=1280 height=720
personalCameras-nhoodCamera-tiltAngleRange.jpg - width=1280 height=720
personalCameras-knownIssues.jpg - width=1280 height=720
The main features are:
- more freedom: extended zoom, camera tilt angle, and in some cases movement range,
- reduced smoothing: the camera stops moving around or zooming in/out faster than in an unmodded game,
- slightly wider field of views: adapted to a 16:9 screen – except for free cameras, which have a wide range of field of view settings.
See the installation section.
The cameras activated with the Tab key in the lot and neighborhood views.
Designed to give more precision when taking screenshots.
File name: FirstPersonCameras
Changes compared to the cameras in an unmodded game:
- Keyboard control – general:
- The camera stops moving or zooming almost immediately after you release a pressed key.
- Very fast transitions between saved camera positions (5 to 9 keys).
- The camera stops moving or zooming almost immediately after you release a pressed key.
- Keyboard controls – moving:
- When you start moving the camera, it moves slowly for a fraction of a second, so that you can move it with great precision using short keystrokes. The camera can still move quickly while holding down a key.
- You can go down lower (for a frog's perspective) and up much higher.
- You can move the camera beyond the lot or the neighborhood boundaries, but you still can't get to the other end of the neighborhood in the lot view.
- When you start moving the camera, it moves slowly for a fraction of a second, so that you can move it with great precision using short keystrokes. The camera can still move quickly while holding down a key.
- Keyboard controls – zooming:
- Extended field of view range: from 1° (a very close zoom) to 120° (significant perspective distortion).
In an unmodded game, it's 20° to 90°.
- Extended field of view range: from 1° (a very close zoom) to 120° (significant perspective distortion).
- Mouse control:
- Much slower, therefore more precise.
- You can point the camera almost vertically up and almost vertically down.
- Much slower, therefore more precise.
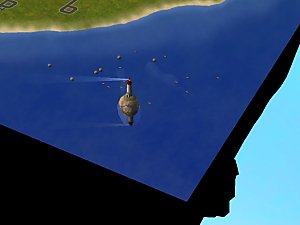
- Neighborhood free camera only:
- Neighborhood skyboxes (custom objects) should no longer be clipped.
A symptom of clipping is a round hole in a skybox, larger or smaller depending on the position of the camera. - You can move the camera much higher or farther away before z-fighting (flickering of things that are very close together, such as the ground and a decorative alley) becomes visible.
This solution comes at a price: objects that are very close to the camera will be clipped.
- Neighborhood skyboxes (custom objects) should no longer be clipped.
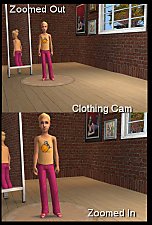
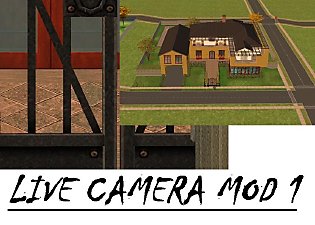
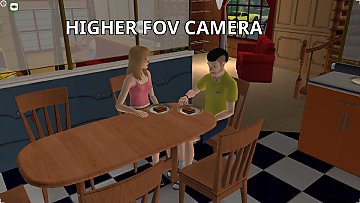
Lot camera
The camera of the lot view: in live, buy, and build modes.
Designed to enhance the building and decorating experience and give more freedom in live mode.
File name: LiveCamera
Comparison with the camera in an unmodded game:
- The same movement range:
You can move the camera outside of the lot, but not as far as to get lost. - Extended zoom range:
6 main zoom levels (the same number as in an unmodded game), from far enough to see an entire 5x6 lot, to very close where the view doesn't even cover 2 full grid squares. - Greatly extended tilt angle range:
You can point the camera almost vertically down, almost parallel to the ground, or towards the sky or a ceiling (-15°) at the closest zoom level.
Such a range makes the buy/build mode special cameras rarely (the 45° camera) or no longer (the top-down view camera) needed. - Slightly wider field of view:
50°, so it's still not very distorted. It's 45° in an unmodded game. - Reduced smoothing:
The camera stops moving around or zooming in/out faster. - No fading:
Trees, ceiling lamps, and stairs no longer fade out when the camera is close enough to them.
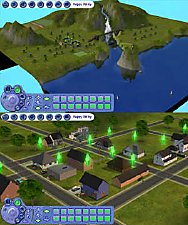
Neighborhood camera
The camera of the neighborhood view.
Designed to expand the view and make decorating easier.
File name: NeighborhoodCamera
Comparison with the camera in an unmodded game:
- Greatly extended movement range:
Up to the neighborhood boundaries, and a bit farther. - Greatly extended zoom range:
6 main zoom levels (3 in an unmodded game), from far enough to see almost an entire neighboorhood to very close, where the view doesn't even cover a 2x4 lot (usually the closest zoom level can only be used when the camera is pointing vertically down). - Greatly extended tilt angle range:
You can point the camera almost vertically down or more parallel to the ground (10° to 20°, depending on the zoom level).
In an unmodded game, the tilt angle of the camera only depends on the zoom level and can't be changed another way. - Wider field of view:
38°, so that it sill gives the effect of looking through a helicopter window. It's 33° in an unmodded game. - Reduced smoothing:
The camera stops moving around or zooming in/out faster.
Known issue: if the camera drift setting is enabled (it's in the camera options) and the camera is zoomed out too far, the terrain and objects disappear partly while the camera is drifting.
Installation
- Go to the Cameras folder in your save folder, which typically can be found in one of these paths:
- Documents\EA Games\The Sims 2\Cameras
- Documents\EA Games\The Sims™ 2 Ultimate Collection\Cameras
- Documents\EA Games\The Sims 2 Legacy\Cameras
- Documents\EA Games\The Sims 2\Cameras
- Make a backup of the original file you want to replace, by renaming it e.g. from LiveCamera to _LiveCamera.
- Extract the zip file with the selected camera file, e.g. LiveCamera, into the Cameras folder.
Uninstallation
- Go to the Cameras folder (see in the installation section for how to find it).
- Remove the file of the camera you no longer want to use, e.g. LiveCamera.
- Rename your backup file to the name it had originally, e.g. from _LiveCamera to LiveCamera.
Other notes
You can use all or some of these cameras.
They should work with other camera mods – as long as those mods don't modify the same cameras as the ones you've chosen from this pack.
Credits
Ciastko
Creators of SimPe
| Filename | Type | Size |
|---|---|---|
| simNopke-personalCameras-freeCameras.zip | zip | |
| FirstPersonCameras.txt | txt | 4986 |
| Filename | Type | Size |
|---|---|---|
| simNopke-personalCameras-lotCamera.zip | zip | |
| LiveCamera.txt | txt | 2322 |
| Filename | Type | Size |
|---|---|---|
| simNopke-personalCameras-neighborhoodCamera.zip | zip | |
| NeighborhoodCamera.txt | txt | 1202 |
| Filename | Type | Size |
|---|---|---|
| CamerasBackup.zip | zip | |
| FirstPersonCameras.txt | txt | 4321 |
| LiveCamera.txt | txt | 2056 |
| NeighborhoodCamera.txt | txt | 916 |
Custom installation instructions! READ ME!
In addition to the normal installation instructions, this download also has a custom instruction, as follows:
1. Download: Click the download link to save the .rar or .zip file(s) to your computer.
2. Extract the zip, rar, or 7z file.
3. Go to the Cameras folder in your save folder, which typically can be found in one of these paths:
- Documents\EA Games\The Sims 2\Cameras
- Documents\EA Games\The Sims™ 2 Ultimate Collection\Cameras
- Documents\EA Games\The Sims 2 Legacy\Cameras
Extract the zip file with the selected camera file, e.g. LiveCamera, into the Cameras folder.
Need more information?
- For a full, complete guide to downloading complete with pictures and more information, see: Game Help: Downloading for Fracking Idiots.
- Custom content not showing up in the game? See: Game Help: Getting Custom Content to Show Up.
|
simNopke-personalCameras-freeCameras.zip
Download
Uploaded: 28th Feb 2025, 1.2 KB.
1,632 downloads.
|
||||||||
|
simNopke-personalCameras-lotCamera.zip
Download
Uploaded: 28th Feb 2025, 979 Bytes.
1,495 downloads.
|
||||||||
|
simNopke-personalCameras-neighborhoodCamera.zip
Download
Uploaded: 28th Feb 2025, 604 Bytes.
1,389 downloads.
|
||||||||
|
CamerasBackup.zip
Download
Uploaded: 28th Feb 2025, 2.5 KB.
397 downloads.
|
||||||||
| For a detailed look at individual files, see the Information tab. | ||||||||
Install Instructions
1. Download: Click the download link to save the .rar or .zip file(s) to your computer.
2. Extract the zip, rar, or 7z file.
3. Go to the Cameras folder in your save folder, which typically can be found in one of these paths:
- Documents\EA Games\The Sims 2\Cameras
- Documents\EA Games\The Sims™ 2 Ultimate Collection\Cameras
- Documents\EA Games\The Sims 2 Legacy\Cameras
Extract the zip file with the selected camera file, e.g. LiveCamera, into the Cameras folder.
Need more information?
- For a full, complete guide to downloading complete with pictures and more information, see: Game Help: Downloading for Fracking Idiots.
- Custom content not showing up in the game? See: Game Help: Getting Custom Content to Show Up.
Loading comments, please wait...
Uploaded: 28th Feb 2025 at 10:17 AM
Updated: 16th Mar 2026 at 9:20 AM
#camera, #lot, #neighborhood, #neighbourhood, #nhood, #hood, #free, #snapshot, #snapshots
-
by Tashiketh updated 30th Mar 2005 at 7:18am
 61
158.1k
44
61
158.1k
44
-
-

-
Neighborhood camera III *works with Apartment Life*
by Masterofallvideogames updated 1st Dec 2007 at 11:01am
67
75.9k
73
-
by Masterofallvideogames 14th Jul 2008 at 1:09am
28
41.3k
21
-
by Tom Duhamel updated 5th Jan 2009 at 6:58am
133
269.5k
707
-
by sims2sims2 updated 25th Mar 2012 at 4:07pm
17
44k
63
-


-

-

-
-
-

-

-

"Go To College" Want Satisfied Before Growing Up
by Nopke updated 28th Nov 2024 at 5:44pm
With this mod, a teen who has gone to college satisfies their Go to College want before growing up. more...
+1 packs
4 8.8k 31 University
-

"Talk About Grilled Cheese" Want Fix
by Nopke 17th Nov 2021 at 4:54am
With this mod, both Sims talking about grilled cheese fulfill their Talk to [Sim] about Grilled Cheese wants. more...
1
6.1k
31
-

-


About Me
I don't take requests.
Latest updates of my mods | Web tools for modders
Discord | Support me on Ko-fi